The wall above my bed has been looking pretty bare all year. I’ve looked at a lot of DIY headboards and other dorm-decor tips, but nothing has really seemed perfect for me. My constellation-patterned bedset demands a certain minimalist flair, so I decided – why not take inspiration from there? In case anyone else is looking for some minimal-chic wall art – or just loves stars like I do – I’ll show you how I did it!

Can you tell I’m a fan of geometric patterns yet?
How to Make DIY Constellation Wall Art
Figuring out how to get the heavens onto my ugly, off-white dorm walls was certainly a challenge. I wanted to keep the pattern simple, and I needed to use materials that wouldn’t damage the walls (so paint was, unfortunately, out). Of course, then I remembered my secret dorm-decorating weapon – washi tape.
Washi tape is a lot like painter’s tape, it’s essentially a thin, flexible strip of paper with a tacky adhesive on one side. Someone, somewhere, got the bright idea to start changing the colors and patterns on the paper, and washi tape was born. It’s popular for scrapbooking and, unsurprisingly, decorating, as it won’t damage painted surfaces, even when removed, which makes it perfect for dorm decorating.
What You’ll Need
You probably already have most of what you need for this project, with the possible exception of washi tape. As wonderful as it is, washi tape isn’t expensive at all – I picked up three rolls for $6 at Hobby Lobby over the summer, including the thin black one I used in this project. Any color or width that suits your tastes will work, though!
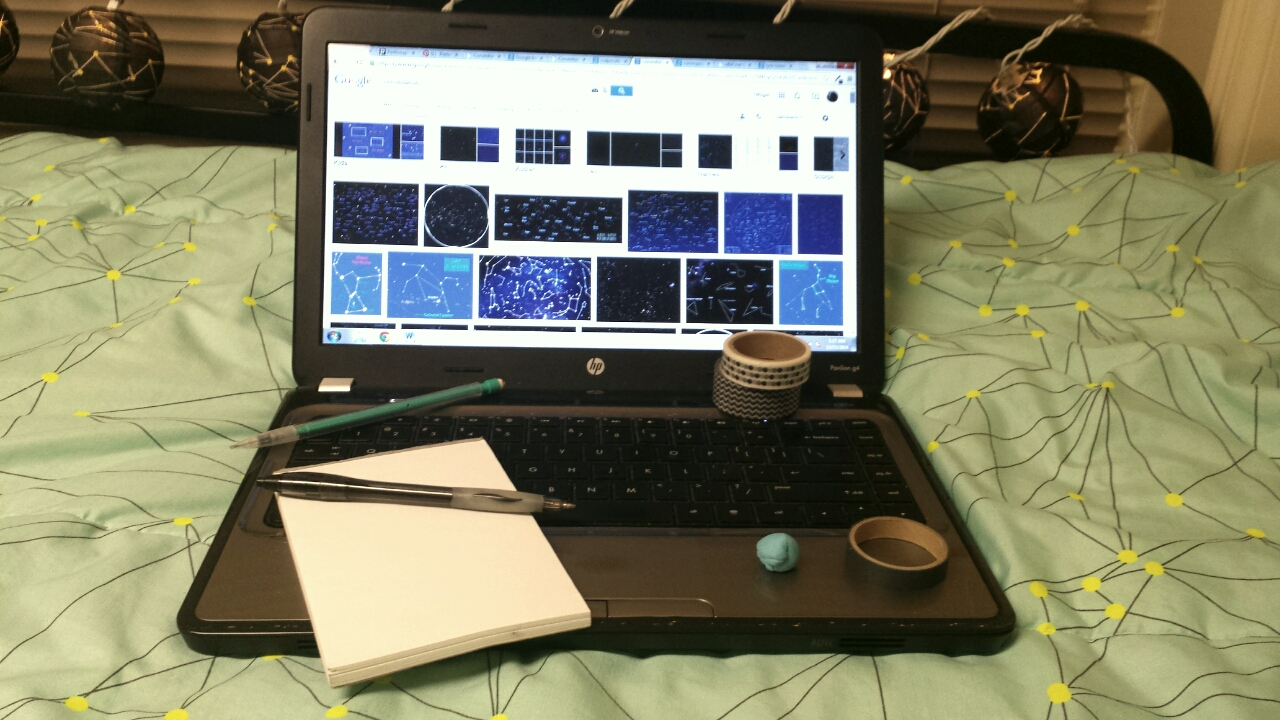
Unless you count the laptop, you need less than $10 for this project. Perfect for the student budget.
- Washi tape
- Paper
- Pen/pencil
- Contellations
- Poster putty (optional)
Getting Started
The first thing you’ll want to do is choose your constellations. You could make some up, if you wanted, and arrange lines into whatever shapes you want. I chose to use real constellations, though, since I’m space-nerdy enough to have favorites. I skipped out on some (Orion, Canis Major) that looked too much like stick figures, and settled on five – Phoenix, Sagitta, Cassiopeia, Vulpecula, and Lyra – that had meaning for me. If you’re into astrology, you could put your star sign on your wall, or if you like Greek mythology, there’s probably a constellation for your favorite myth.
Once I chose my constellations, I used online images as reference for their shapes arranged them on paper until I found a pattern I liked. I was lucky enough to have a notepad with similar ratios to my wall, but keep the shape of the space you’re working with in mind as you plan.
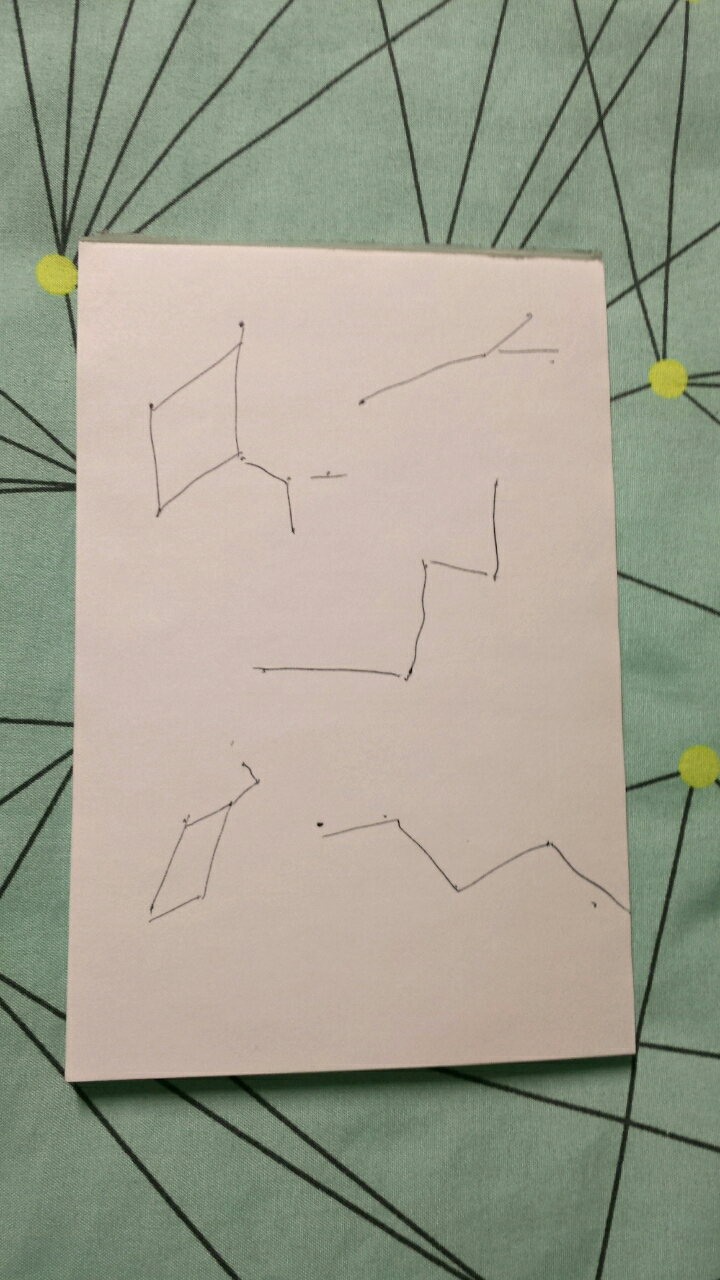
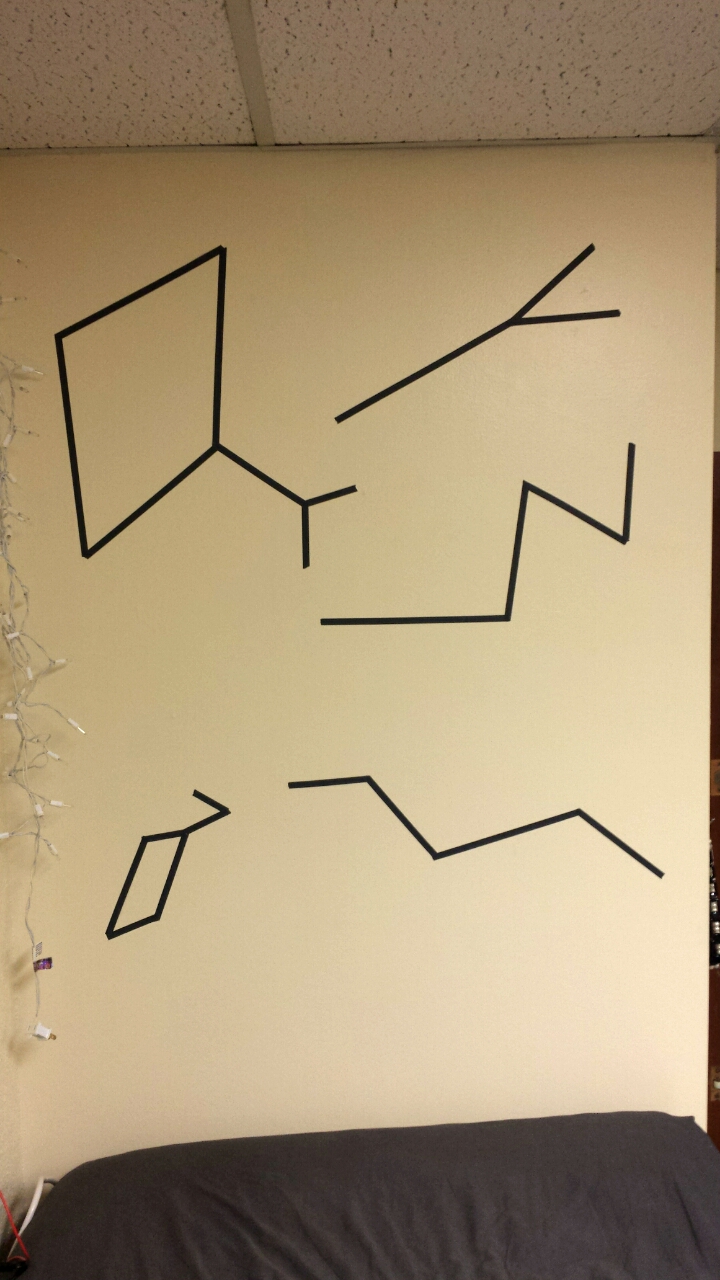
I can’t draw straight lines. Luckily, connecting the dots with tape means I didn’t have to.
Once you’ve got a good arrangement, transfer it to the wall as a series of dots, drawn in pencil. This is the trickiest part – I have the worst spacial skills in the world, so I made a lot of mistakes! This is where the poster putty comes in handy. Erasing might leave unsightly smears on your walls, and rubbing those smears with poster putty gets rid of them.
To double-check the placement of my “stars”, I took pictures of each constellation with my smartphone camera and used the stock drawing ability to draw in the lines. It helped me see that a few of my constellations were off, and I was able to fix them before I started taping!
Connect the Dots
If you’re confident in your shapes, it’s time to start taping! Washi tape is very forgiving – if you find you need to move it, you probably can. Avoid mistakes by unrolling the tape close to the wall without sticking to it, so you have complete control over the length and angle of your lines. Then it’s literally as easy as connecting the dots. Depending on your tastes, you can try to keep your corners and edges crisp by cutting the tape with scissors, but it tears easily, as well.
A few lessons I learned: try not to pull your tape too taut, or it’ll curl off the wall. Likewise, if your tape is too slack, it’ll wrinkle, which can affect how straight your lines are. Work slowly and carefully to avoid these issues. Be sure to run a hand or finger over placed tape to seal it, paying special attention to the edges.
I do not, in fact, sleep on a bare sheet. I just kept tripping over my pillow and eventually stripped the bed for convenience.
Five constellations later, I was finished with my DIY constellation wall art! The taping portion of this project probably took a maximum of fifteen minutes, and that included changing the arrangement of my constellations mid-project. It was also super-fun to watch this come together. I was amazed with how clean and bold the thin, black lines were against the off-white walls, but there’s a lot of room for creativity with patterned or colored tape. If you wanted to, you could easily add “stars” at the junction of each line (I think metallic shapes would look especially nice). I was even tempted to add glow-in-the-dark stars to the design, but they’d have blended too much with my walls. Maybe someone else will find a good way to work them in! The options with this project are pretty much endless.
How would you do this project? Any constellations you would definitely add (or definitely not add)? If anyone else tries this, I’d love to see pictures!


